Using Emojis in a Point and Click Adventure - Part 3
Emojis can be used in a variety of ways as part of creating a point and click adventure. We can use them to compose the background scenes, the game sprites, the user interface, and for mouse cursors. We could also use one for the favicon.
My goal for the 2020 js13kgames contest this year was to use them for as much as I could.
Scene Composition
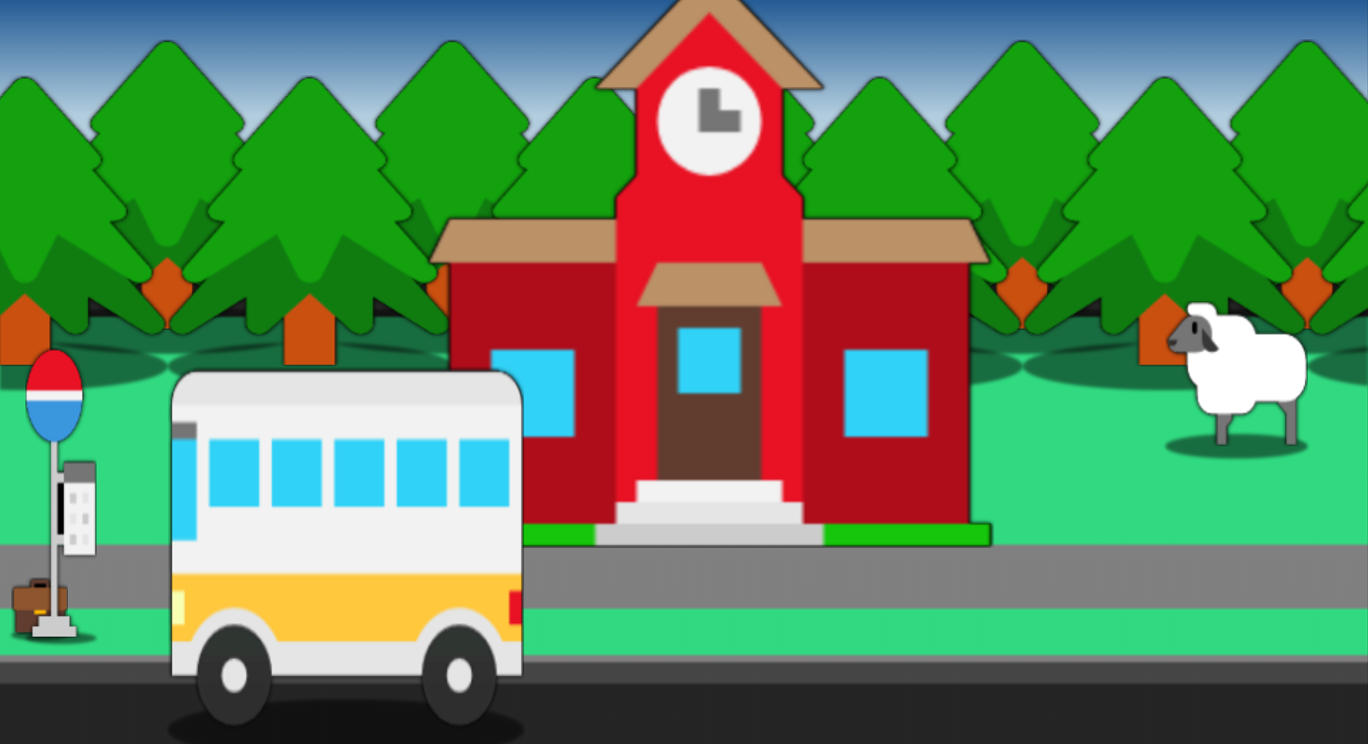
Composing a scene solely with emojis isn’t something that is 100% achievable. We can use things like buildings, trees, and vehicles to build up a scene, but there are no emojis that we could use for the background; well, not ones that are consistent across all platforms. Perhaps the cityscape emojis could be useful as backgrounds in some situations, but what we really need is something more generic.
We have to start with some kind of default background. Since most of my locations were outside, and with buildings, I decided a red brick wall was something that most would have in common. I also added a blue sky, with a gradient, some green grass, a footpath and a road.
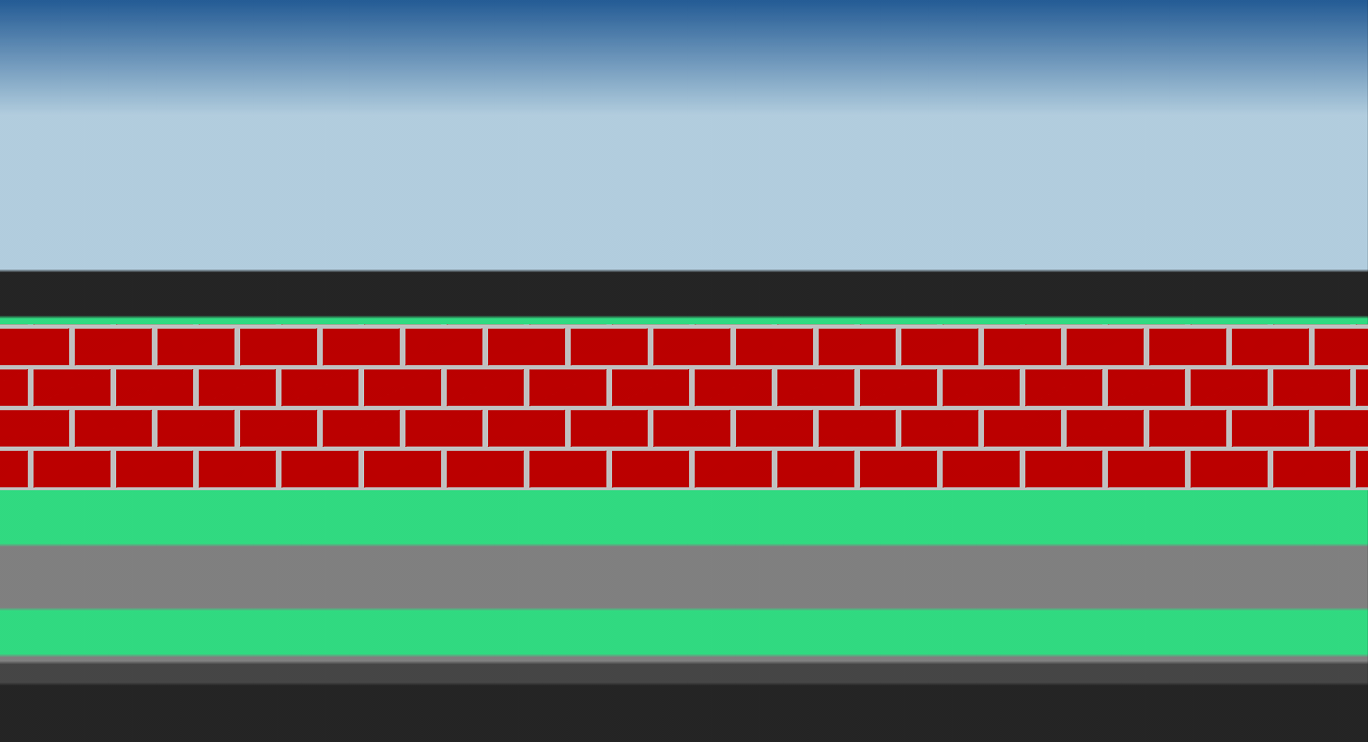
The above is all created with CSS, most of it as a single linear gradient. On top of this, I added the emojis that made up the current scene:
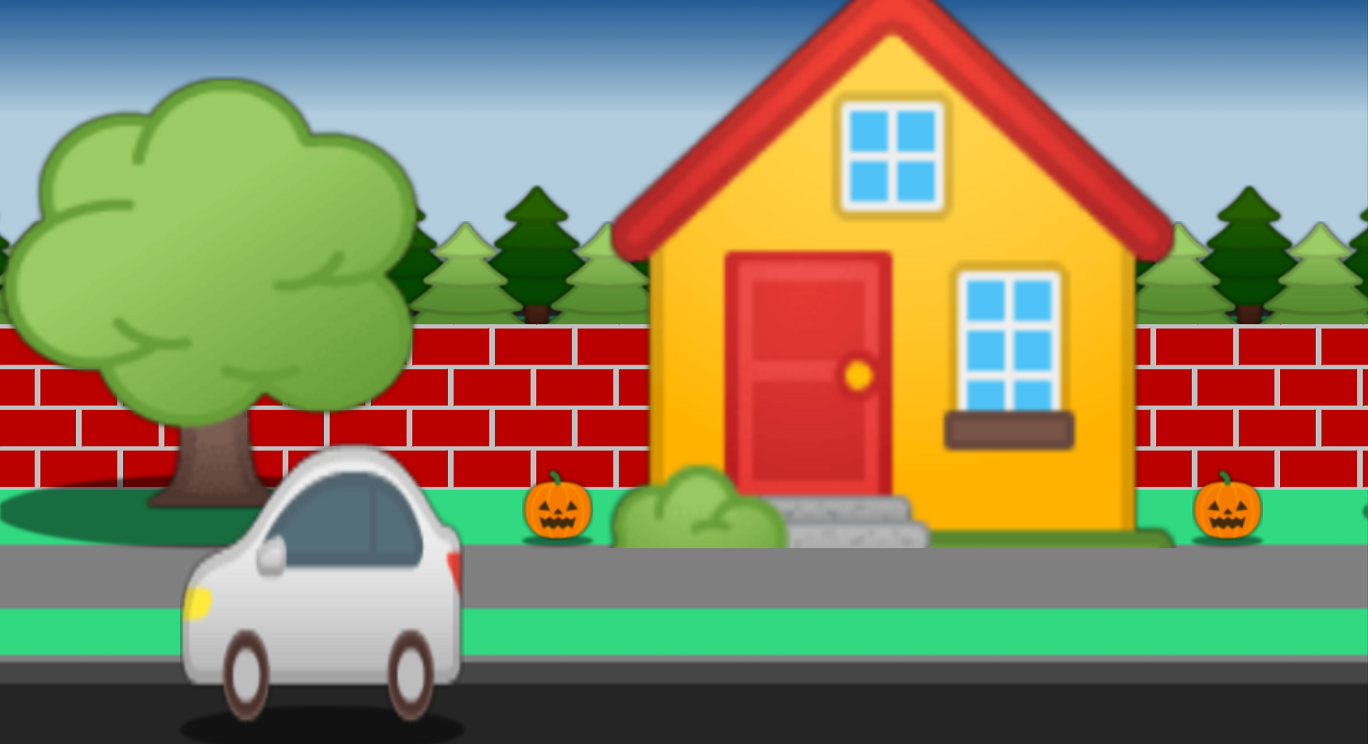
All of these larger sized emojis, that are used to compose the background scene itself, are drawn on individual canvas elements using the renderEmoji method shown in the first part in this series. The choice for drawing them on a canvas, rather than simply as text, was originally to support Windows 10 emojis, as discussed in that post.
As the game progressed, I discovered that there were other benefits to having them drawn on a canvas, which we will cover in a later section of this article entitled “Determing the thing”.
Different Shades
Sometimes the default appearance of an emoji, such as a tree, gets a bit monotonous. In “The King’s Missing Page”, I use a row of trees in the background for most of the scenes. This looked a bit plain when there wasn’t some kind of variation:
Applying a CSS filter to darken one of the rows of trees makes it look a lot more interesting:
.dark {
  filter: brightness(0.4) saturate(3);
}
The same technique could be used to apply some kind of variation to any of the emojis.
The unicode standard itself supports variations to certain types of emoji, such as those showing skin colour, using something called “modifiers”, but for a tree, a building or a vehicle, there isn’t such a mechanism at the current time, which is why a CSS filter is useful to introduce a bit of variation.
Point and Click Interface
“The King’s Missing Page” uses an old school graphic adventure point-and-click user interface, similar to those seen in some of the Sierra On-line games, such as King’s Quest 5 and 6. It is very easy to create such an interface using emojis, due to there being emoji characters that look virtually the same as the icons that were used in those old school games:
A walking person, an eye, a hand, and a speech bubble. These are all familiar to those who have played such classic games:

I designed my game so that only five action verbs were required: “Walk to”, “Look at”, “Pick up”, “Talk to” and “Use”. Four of these are represented by the four icons on the left of the image above.
The rest of the “action” bar is taken up by the inventory, a scrollable area inside which emojis are also used. The unicode standard includes emojis that cover a wide range of different inventory items that could be found in an adventure game, and they all have the look that you’d expect from such a game. It’s a perfect source for item images.
For all of the emojis on the “action” bar, whether they be verb icons, or item icons, they are rendered simply as emoji text.
<div id="commands">
    <span data-name="Walk to">🚶</span>
    <span data-name="Look at">👁️</span>
    <span data-name="Pick up">🤚🏼</span>
    <span data-name="Talk to">💬</span>
</div>

<div id="itemlist">
    <span data-name="map">🗺️</span>
    <span data-name="rose">🌹</span>
    <span data-name="tulip">🌷</span>
    <span data-name="briefcase">💼</span>
    <span data-name="bank card">💳</span>
    <span data-name="water pistol">🔫</span>
    <span data-name="cash">💵</span>
</div>
There is no need to render these ones on a canvas as was done for the scene composition. These action bar emojis are drawn a lot smaller, making the black outline seen on Windows emojis far less noticeable.
Mouse Cursors
Whenever a verb icon is clicked, the mouse cursor changes to match that verb icon. Likewise, when an inventory item is clicked first (i.e. not after clicking on a verb icon), then the “Use” verb is implied, and the mouse cursor changes to match the inventory item.
All of these mouse cursors can be rendered using emojis. When the game first starts up, it renders the various mouse cursors up front, using the same rendering code used for rendering the sprites on the screen (the renderEmoji code can be seen in part 1 of this series). A mouse cursor uses a much smaller emoji size though.
The following code shows how the mouse cursors are rendered:
// Initalise the mouse cursors.
// Note: Firefox ignores custom cursors bigger than 32x32 when near the Window edge.
let cursorSize = navigator.userAgent.match(/Firefox/)? 32 : 50;
this.cursors = {};

['🚶','🤚🏼','⬆️','💬','⬇️','⏳','↖️','👁️','⬅️','➕','↗️','🤏🏼','➡️','❔','↙️','🔍','↘️']
).forEach((c,i) => {
    // Calculate hotspot Y position for cursor.
    let hotspotY = [cursorSize-1, cursorSize/2][i % 2];
    // Render emoji at cursorSize and build CSS custom cursor definition.
    this.cursors[c] = `url(${Util.renderEmoji(c, cursorSize, cursorSize)[0].toDataURL()}) ${cursorSize/2} ${hotspotY}, auto`;
    // Add custom property to body tag with name matching emoji char and value the CSS cursor value.
    document.body.style.setProperty(`--${c}`, this.cursors[c]);
});
The rendered cursors are stored in two different places: One place is in an instance variable within the game, and the other place is as a CSS custom property on the document body tag. The latter case is so that CSS declarations can refer to these cursors.
Cursor Size Restrictions
As mentioned in the comments included in the above code snippet, Firefox behaves strangely when a mouse cursor is greater than 32x32. This is for security reasons and is discussed in this Mozilla ticket. The security concern is that large mouse cursors can be used to deliberately trick users when drawn over the native UI of the browser, something that tech support scammers have taken advantage of.
In Firefox, if the cursor is bigger than 32x32, and it moves close to the edge of the window, then the custom cursor disappears. When I say “close to”, it appears to happen when any part of the cursor starts moving outside of the window, rather than when the hotspot moves outside of the window. This is really quite noticeable. For a 50x50 custom mouse cursor, it switches to the default pointer cursor and its quite obvious that the hotspot of the pointer is still 25 pixels from the edge.
This is unfortunate, since rendering color mouse cursors at a size of 50x50 looks much nicer than 32x32.
Chrome also has this ticket related to the same issue, but they appear to have handled it in a different way. For cursors larger than 32x32 in size, the cursor doesn’t disappear until the hotspot moves outside of the window. This is more in line with what the user would expect. By playing the game, the user becomes familiar with where the cursor hotspot is, which is why the behaviour in Firefox is quite jarring.
Due to the Firefox behaviour, “The King’s Missing Page” deliberately renders mouse cursors in Firefox at a size of 32x32 to avoid the issue, whereas for all other browsers, it uses 50x50.
Cursor Changes
The default verb action in the game is “Walk to”. Whenever a sentence is composed and execued, e.g. “Look at chipmunk” or “Pick up tulip”, the verb switches back to “Walk to”. This verb is a special verb, in that it behaves both as the “Walk to” verb, but also in some cases as if no action verb is selected, such as when the mouse is over the inventory items. The player obviously can’t “Walk to” an inventory item, so in this scenario if an inventory item is clicked on, the “Use” verb is assumed.
When the currently active verb is “Walk to”, then the cursor also changes to various arrows when the mouse passes over certain things on the screen, for example, changing to an upwards arrow when over a building, or downwards arrow when over the road. Certain parts of the footpath should change it to diagonal arrows or left/right arrows.
The mouse cursor also changes to an hour glass (⏳) when user input is disabled.
// Update cursor. If input disabled, shown hour glass; otherwise verb icon.
let newCursor = this.cursors[this.inputEnabled? this.verbIcon : '⏳'];
if (newCursor != this.currentCursor) {
    // If the cursor has changed, update cursor on wrap element.
    this.wrap.style.cursor = newCursor;
}
this.currentCursor = newCursor;
The above code shows the case where we simply update the cursor on the main wrapper element whenever it needs to change. It doesn’t show how the unique behaviour of the “Walk to” verb is handled.
Custom CSS Property Fallback
I struggled for a while to get that particular part of the mouse cursor behaviour to work as I wanted it to. The problem was that I wanted every other verb icon (i.e. the eye, hand and speech bubble) to always be the mouse cursor regardless of what element on the screen the mouse was moving over. Those particular cursors had higher precedence. But for the walking icon, it had the lowest priority and the mouse cursor needed to instead respond to the properties defined in the CSS.
I knew that putting “cursor” CSS rules for the various elements I wanted the cursor to change on was a key part of the solution. But it needed to be conditional on what verb was currently active. I started out by thinking that I could have a single custom CSS property called “–c” that the Javascript could update based on the requirements I’ve described. There just didn’t seem to be a way to make that work though.
I then remembered that the CSS var function supported a fallback value. This got me thinking: If the “–c” custom CSS property was set only when the active verb icon was not “Walk to”, then I could make use of the CSS variable fallback mechanism.
if (this.verbIcon != '🚶') {
    this.wrap.style.setProperty('--c', newCursor);
} else {
    this.wrap.style.removeProperty('--c');
}
With the above bit of Javascript in place, the CSS could then look like the following to achieve what I wanted. Each area of the screen that required this behaviour could define a “cursor” property value with “–c” as the overriding CSS property value, and a fallback to a specific cursor relevant only to that element:
.building {
  cursor: var(--c, var(--⬆️));
}
.road {
  cursor: var(--c, var(--⬇️));
}
.left_path {
  cursor: var(--c, var(--↗️));
}
.right_path {
  cursor: var(--c, var(--↖️));
}
.left_path.down {
  cursor: var(--c, var(--↙️));
}
.right_path.down {
  cursor: var(--c, var(--↘️));
}
Determining the ‘thing’
“The King’s Missing Page” has a section of the screen that shows the sentence that is being constructed to tell “Detective Pip” what to do. The sentence is formed from the verb, e.g. “Look at”, and a thing, e.g. “tree”.
The “thing” part of that sentence is usually a sprite within the current scene. These sprites are instances of custom x-sprite elements and contain a canvas element. Both of these elements are rectangular in shape, which is true of most HTML elements.
A mouse move event handler is registered with each of the sprites. This event is fired whenever the mouse moves over the box within which the element exists. The idea of the event handler is to update the “thing” part of the sentence, e.g. “Look at” “tree” or “Walk to” “house”.
The problem with this is that the visual part of the sprite is never rectangular in shape. For something like a palm tree, quite a lot of that bounding box is transparent. It wouldn’t be correct to update the “sentence” to include the sprite until the mouse cursor is actually over the visual part of the sprite.
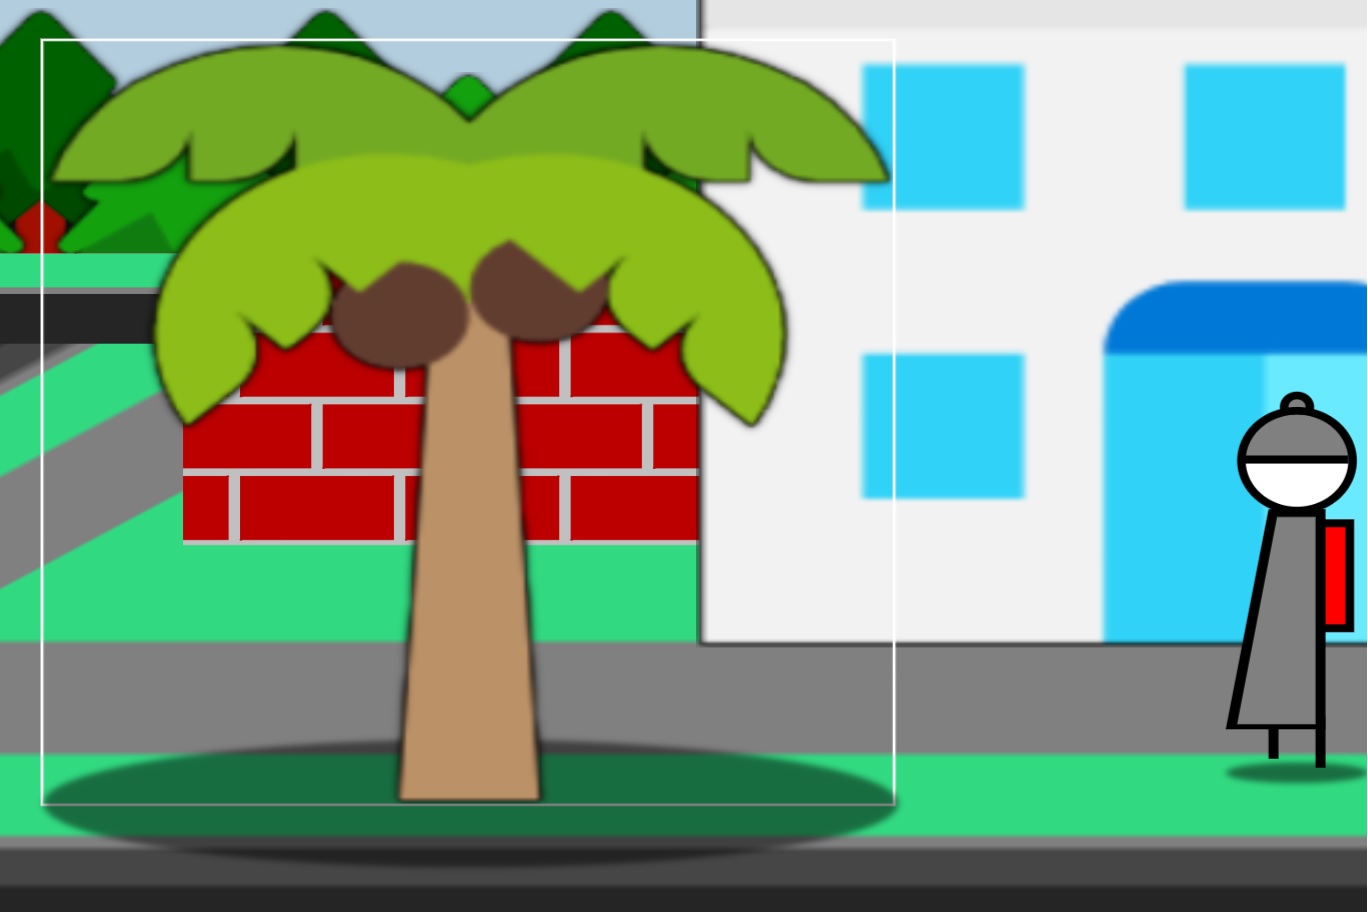
In some cases, there might be another sprite behind a sprite, e.g. a building or wall behind a tree, so rather than the sentence being updated to include “tree”, if the cursor is over the transparent part of the sprite, then it should instead fallback on the sprite behind it.
The following code shows how this is done:
/**
 * Handles mouse move events, primarily so that the 'thing' property is updated
 * when the mouse moves over objects on the screen. If the object has a canvas,
 * then it uses the image data to determine when exactly the mouse is over the
 * object. If the pixel is transparent at that position, then it falls back on
 * whatever is underneath the object.
 *
 * @param {MouseEvent} e The MouseEvent for the mouse move event.
 */
objMouseMove(e) {
    // Get's the element that the mouse is moving over.
    let target = e.currentTarget;

    // Only certain elements in the game have a canvas, i.e. the game sprites.
    if (target.canvas) {
        // Map the mouse position to an X/Y position within sprite canvas.
        let rect = target.getBoundingClientRect();
        let x = ~~((e.clientX - rect.left) / this.scaleX);
        let y = ~~((e.clientY - rect.top) / this.scaleY);

        // Get the pixel data from the canvas.
        let { width, height } = target;
        let ctx = target.canvas.getContext('2d');
        let imgData = ctx.getImageData(0, 0, width, height);

        // If the pixel at the X/Y position is transparent, then get sprite underneath.
        if (!imgData.data[(y * (width << 2)) + (x << 2) + 3]) {
            // Get all elements that have a canvas (i.e. sprites) in current mouse position.
            let elements = document.elementsFromPoint(e.clientX, e.clientY).filter(s => s instanceof Sprite);
            // Index 0 is the currentTarget, so index 1 is the one immediately below.
            target = elements[1]? elements[1] : null;
        }
    }

    this.thing = target? target.dataset.name : '';
}
Elements From Point
The mouse position is mapped to a pixel position within the canvas. If that pixel is not transparent, then the “thing” will be the sprite that has received the event. If, however, the pixel is transparent, then the document.elementsFromPoint function is invoked to get all elements at the current mouse position.
The elements are in Z order, so the first one will be the sprite that received the mouse move event. The next sprite element in the list will be the one immediately behind it, from which the name of the “thing” will be taken. The code above is looking only at the element immediately behind the current target, but it could be extended to continue looking back through the element list, so as to support more than two sprites overlapping.
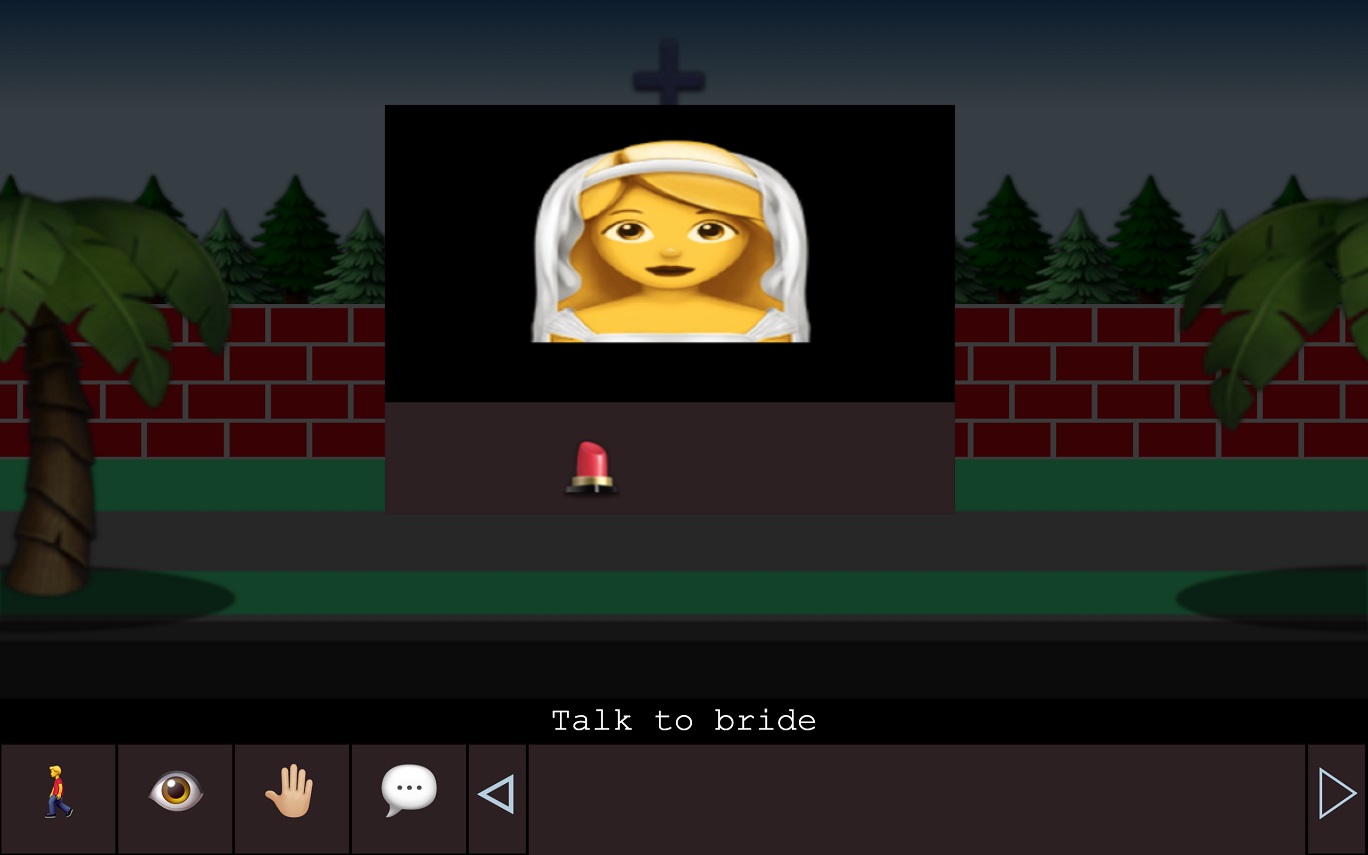
People
One of the main limitations of using purely emojis to create an animated point-and-click adventure game is that all the emojis relating to people are of static poses. It isn’t really possible then to use the walking person emoji for your main character, since the movement wouldn’t have any kind of cycling animation, such as moving legs and arms.
I tried to avoid drawing attention to this by using the main character that I had used in my previous games, i.e. “Pip”, which isn’t an emoji. But it left me with a problem as to how to handle the other people in the game. There are plenty of different people emojis, but almost all of them are of the top part of the body.
This gave me an idea that I could use them in a “behind the counter” scene, where only that portrait view of the person is visible. The following is an example from my game of the bride in the church:
And this one is of the hotel clerk:

This is how I handled inside locations, and I think it worked out quite well.
Favicon
As a final point, and although I didn’t do this for “The King’s Missing Page”, it would be trivial to use the same renderEmoji method shown in part one of this series to render and then set the favicon for the page. The following code is an example of how this could be done:
let favicon = document.getElementById('favicon');
favicon.href = Util.renderEmoji('👁️', 32, 32).toDataURL();